Initial Setup
This section has steps for importing Crest content into a project, and for adding a new water surface to a scene.
Requirements
Unity 2022.3 or later, latest patched version
Shader Graph package
Shader compilation target 4.5 or above
Graphics API that is not OpenGL or WebGL
Important
It may be necessary to update to the latest patched version of Unity in order for a problem to be solved. Furthermore, legacy versions of Unity are not supported.
Sample scenes when using BIRP uses the post-processing package. If this is not present in your project, you will see an unassigned script warning which you can fix by removing the offending script. Furthermore, scenes will look overexposed.
Migrating from Crest 4
Please see the Migration page.
Importing Crest files into project
The steps to set up Crest in a new or existing project are as follows:
Render Pipeline Setup
Ensure that your chosen render pipeline is setup and functioning, either by setting up a new project using the appropriate template or by configuring your current project. This is beyond the scope of this documentation so please see the Unity documentation (BIRP, HDRP, URP) for more information.
Switch to Linear space rendering under . If your platform(s) require Gamma space, the material settings will need to be adjusted to compensate. Please see the Unity documentation for more information.
Tip
If you are starting from scratch we recommend creating a project using a template in the Unity Hub.
Importing Crest
Import the Crest package into the project using the Package Manager window in the Unity Editor.
Crest is a UPM package and thus is imported into the Packages directory. Once imported Crest packages will be listed in the package manager window. Familiarity with the package details pane is important as this is where Samples are imported from.
Importing Sample Content
Sample content is hidden in the file system, and requires importing from the package manager window. The Importing Crest step needs to be done first.
Open
Set the packages menu to Packages: In Project (see C below)
Select the Crest package you are interested in from the package list under the Wave Harmonic group (see H below). If using Unity 6, Crest will show up twice in the menu, make sure to select the package under the Wave Harmonic group towards the bottom.
In the main window that shows the package’s details, find the Samples section (see J below)
To import a Sample into your Project, click the Import into Project button. This creates a Samples folder in your Project and imports the Sample you selected into it. This is also where Unity imports any future Samples into.
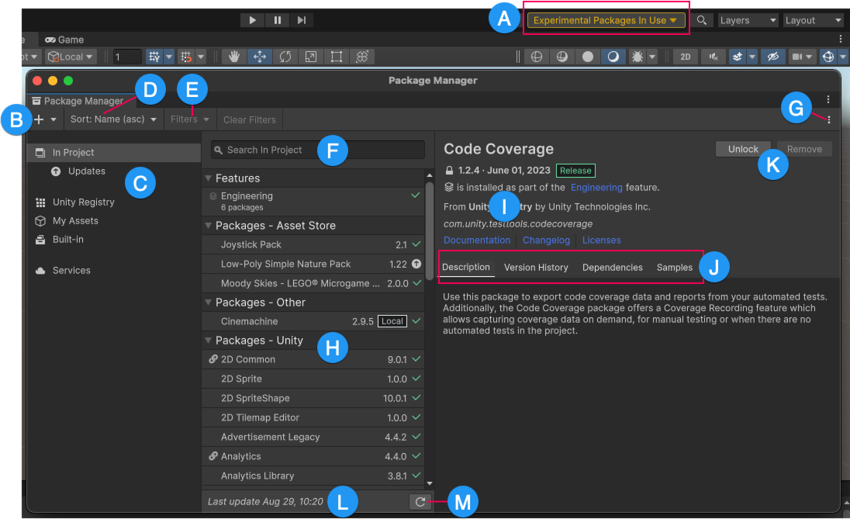
Fig. 1 Package Manager window
Adding Crest to a Scene
The default use case for Crest is an infinite ocean. The steps to adding an ocean to a scene are as follows:
Create a new Game Object for the ocean.
Assign the Water Renderer component to it. This component will generate the water geometry and do all required initialisation.
Set the Y coordinate of the position to the desired sea level.
Tag a primary camera as MainCamera if one is not tagged already, or provide the Camera to the View Camera property on the WaterRenderer script. If you need to switch between multiple cameras, update the ViewCamera field to ensure the water follows the correct view.
Be sure to generate lighting if necessary. The water lighting takes the ambient intensity from the generated spherical harmonics regardless of whether you use baked or realtime lighting. It can be found at the following:
Tip
You can check Auto Generate to ensure lighting is always generated.
To add waves, create a new GameObject and add the Shape FFT component. See Waves section for customisation.
Continue on to the Quick Start Guide.
Frequent Setup Issues
The following are issues with the install process which come up frequently.
I am seeing errors in the console and/or visual issues
When changing Unity versions, setting up a render pipeline or making changes to packages, the project can appear to break. This may manifest as spurious errors in the log, no water rendering, magenta materials, scripts unassigned in example scenes, etcetera. Often, restarting the Editor fixes it. Additionally, re-importing broken (ie magenta) materials/shaders may be required. Clearing out the Library folder can also help to reset the project and clear temporary errors. These issues are not specific to Crest, but we note them anyway as we find our users regularly encounter them.
I am seeing magenta materials after changing render pipelines
Unity has a bug where sometimes it will not correctly switch materials to the current render pipeline. Solutions can vary:
Restarting Unity
View the affected material’s inspector
Reimport the affected material/shader
This affects Shader Graph specifically. Find our water Shader Graph, right click and re-import it. It may appear as a blank file icon instead of the usual Shader Graph icon.
I can enter play mode, but errors appear in the log at runtime that mention missing ‘kernels’
Recent versions of Unity have a bug that makes shader import unreliable. Please try reimporting the Packages/Crest/Runtime/Shaders folder using the right click menu in the project view. Or simply close Unity, delete the Library folder and restart which will trigger everything to reimport.
Why aren’t my prefab mode edits not reflected in the scene view?
Crest does not support running in prefab mode which means dirty state in prefab mode will not be reflected in the scene view. Save the prefab to see the changes.
I am seeing “Crest does not support OpenGL/WebGL backends.” in the editor
It is likely Unity has defaulted to using OpenGL on your platform. You will need to switch to a supported graphics API like Vulkan. You will need to make Vulkan the default by overriding the graphics APIs.
Why I am seeing “The referenced script on this Behaviour is missing!” or similar in Crest’s sample scenes and prefabs?
This is normal and can be ignored. The sample scenes support all render pipelines which require render pipeline specific components to be serialized in the scene. If a render pipeline package is missing, then those components will also be missing.